
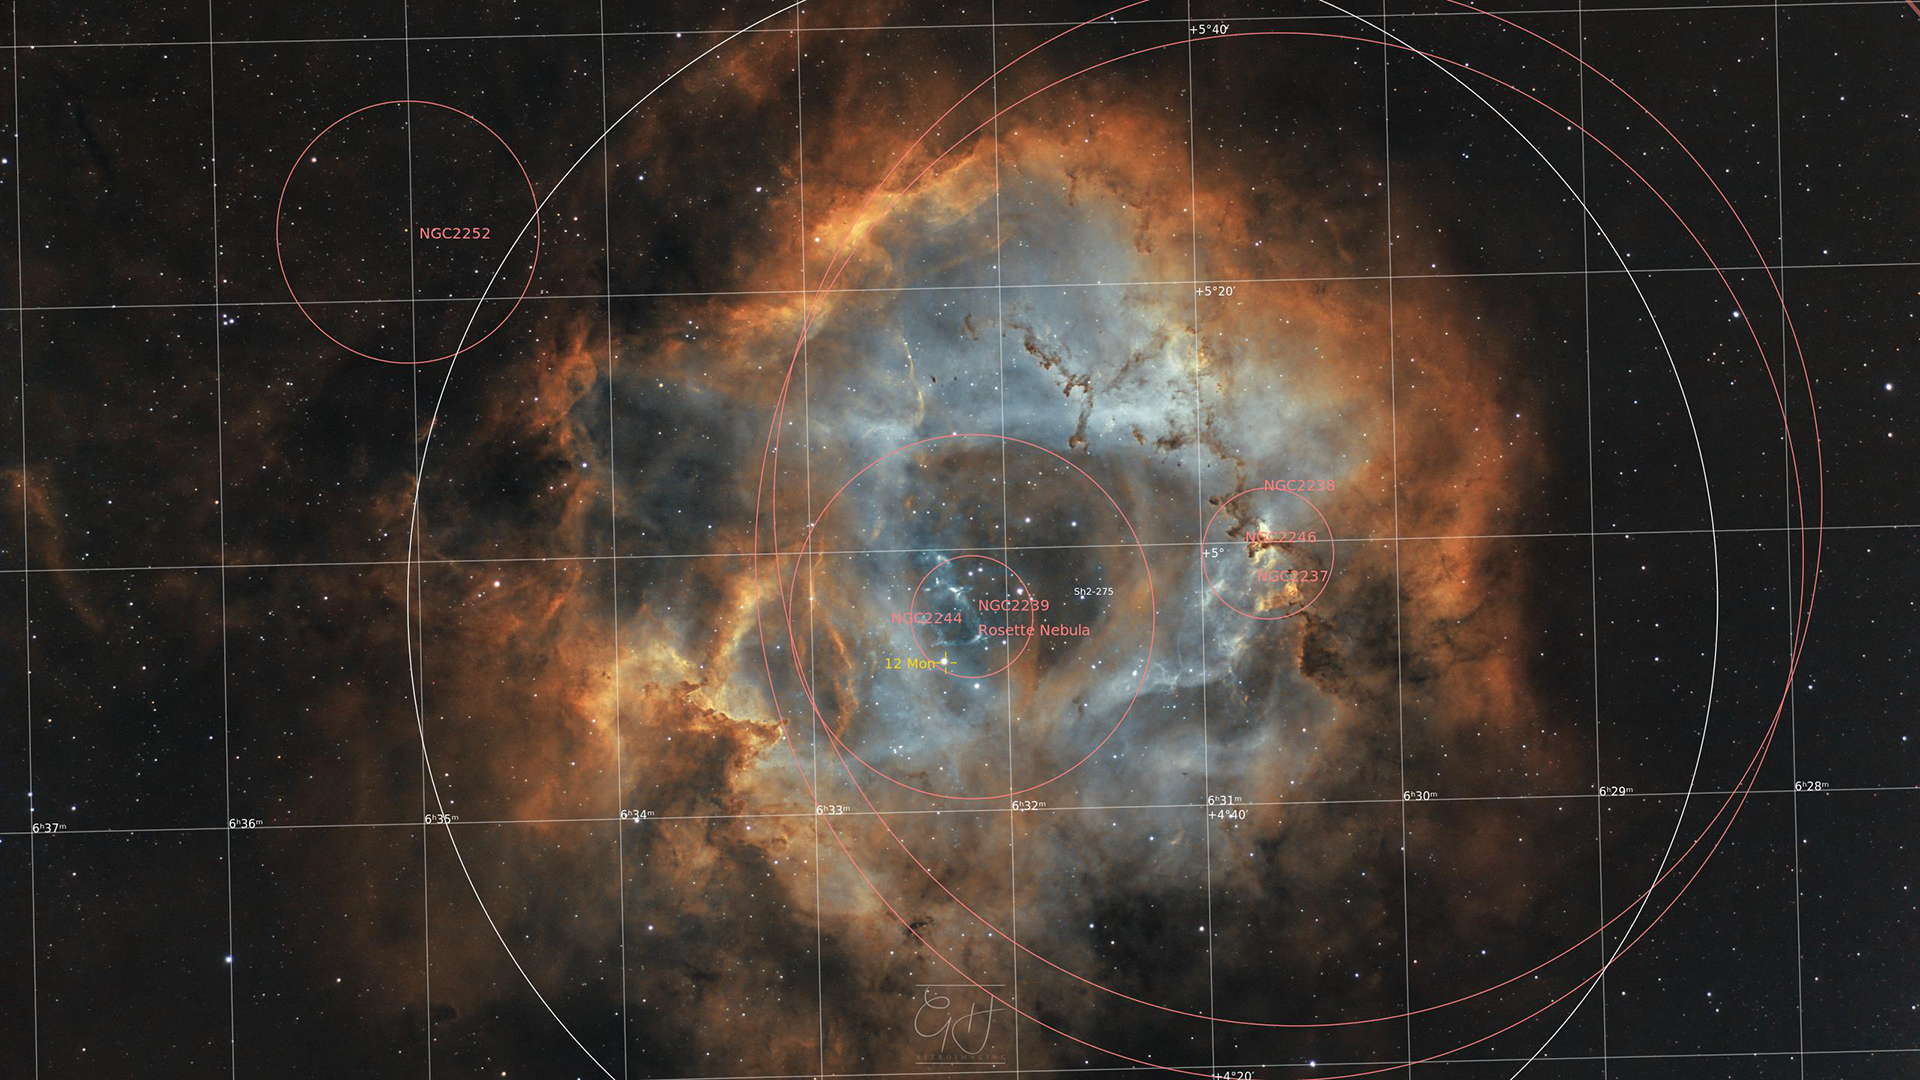
The Rosette Nebula in narrowband with RGB stars

I wasn't really expecting to have enough time in the gaps between clouds to produce a finished image on this object. The weather forecast earlier in the week had indicated a good opportunity on the 28th of February, but it turned out to be clear on the 27th as well so I took the opportunity to set up and see what I could produce in only 2 nights. This is a nice bright nebula, so I was reasonably confident if I managed 2 reasonably long capture sessions over the 2 nights.
The Rosette Nebula is a large hydrogen region in the Monoceros area of the Milky Way galaxy. It is also known as Caldwell 49, and the central part of the nebula contains the open cluster NGC 2244 (also known as Caldwell 50). The stars in this cluster were formed from the gases of the Rosette Nebula itself. Depending on how you view the image (and on how good your imagination is) you may also be able to see why the object is sometimes known as the Skull Nebula. The nebula and its associated cluster lie around 5000 light years away from Earth, and occupy a space around 130 light years in diameter. You can read more about this object on its Wikipedia page at this link.
I have to be honest and say that the process of capturing the raw pictures that eventually become a final image, which started out as being really exciting in the early days of trying to make sure all the equipment was working correctly, communicating with all the other components and maintaining accurate pointing at the target, is now a little bit mundane. It now rarely takes more than about 20 minutes to bring all the gear out into the garden, polar align the mount (the process by which the tracking mount's rotational axis is made parallel with the Earth's axis of rotation), select a target, and start an imaging plan that automatically takes care of keeping the telescope accurately aimed, swapping filters as required, and refocusing the scope regularly to maximise the quality of the captured pictures. I say this not with any desire to seem smug or to show off, but rather to encourage anyone starting out in this hobby who may be finding some elements a bit tricky to believe that it all gets easier with practice. I remember the nights of taking hours to battle with all the different parts that need to work effectively and feeling like it would never work. Astrophotography is not an easy hobby, but I don't believe that anything that is easy can ever be as rewarding as finally overcoming the challenges that seemed to be too much in the beginning.
The real fun for me now is in processing all the separate pictures into a finished image. This is still an area where I feel like I have so much to learn, but it is fantastic that there are so many people in this hobby who are happy to share their knowledge and experience on various websites, YouTube channels, Facebook groups and similar places in a way that really helps astrophotographers of all skill levels to improve. This image was so much fun to process that I wasn't content with just one version of the final image. Although there is only one shown on this page, if you scroll to the bottom you can watch a looping video that cycles smoothly through a selection of differently coloured images all based on the same starting data. The individual pictures have been taken through different filters, with short exposures through red, green and blue filters (very much like the ones used in 'normal' camera sensors to create standard daytime colour photographs) used to create accurately coloured stars, combined with longer exposures through narrowband filters that capture light emitted by Hydrogn, Oxygen and Sulphur as they emit photons with very specific wavelengths corresponding to the energy lost as electrons in their atoms drop to lower energy orbitals.
The final version I have chosen has been made by blending 2 different full colour images. The first image was created in the Hubble Palette, which assigns the sulphur images to the red colour channel, hydrogen to the green channel and oxygen to the blue channel. It's not quite as simple as that though, and there is still a lot of image manipulation involved in reaching a good colour balance. The second image was created using only the hydrogen and oxygen emmission data, with hydrogen assigned to the red channel, and mix of hydrogen and oxygen in the green channel, and oxygen alone in the blue channel. I realise for most people this is way more information than you really want to know, but feel free to post any questions at the bottom of the page if you'd like to know more.
You can view this image in the WorldWideTelescope by clicking here.
Equipment details:
Mount: Skywatcher HEQ5 Pro
Telescope: Skywatcher Evostar 72ED
Telescope Accessory: OVL Field Flattener
Telescope Accessory: Gerd Neumann Camera Tilt Unit
Camera: QHY294M Pro
Filter Wheel: QHY Colour Filter Wheel
Filters: Antlia EDGE Series 4.5nm SHO Filters, Antlia V-Pro Series LRGB Filters
Guide scope: Skywatcher 9x50 finder guide scope
Guide camera: ZWO ASI178MC
Capture details:
Frames: 75
Exposure per frame: 300" (x16 SII, x19 H-alpha, x16 OIII), 30" (x8 red, x8 green, x8 blue)
Total Exposure Time: 4 hours 27 minutes
Camera Control Software: AstroPhotography Tool
Guiding Control Software: PHD2
Processing details:
Preprocessing Software: Starnet++
Stacking Software: AstroPixelProcessor
Image Manipulation Software: Siril and Adobe Photoshop
The range of colour palettes that can be created by combining the narrowband data in different ways is pretty much infinite. Some of them are spectacularly beautiful, some are maybe not quite so appealing. The best part of this hobby is being able to unleash an artistic part of me that I never really thought I had until quite recently.


&creditsUrl=&ra=99.076341&dec=4.593412&x=168.3&y=193.7&rotation=178.75&thumb=https://nova.astrometry.net/image/29616037)
Sign in to enable commenting